

Getting Started
Please refer to our Quickstart Guide. The Full API Reference, Library Source Code, and an Example Application is documented in our GitHub repo.Installing the Library
After setting up your development environment for React Native, navigate to your app’s root directory and install the Mixpanel React Native SDK. The library requires React Native v0.6+.Since Xcode 12.5, there is a known swift compile issue, please refer to this workaround. However the compile issue has been resolved in Xcode 13.2.1+, there is no extra step required as long as you upgrade to Xcode 13.2.1+.
Mixpanel class from the SDK, create an instance of Mixpanel using your project token, then initialize by calling .init().
Library Configuration
TheMixpanel constructor accepts up to four arguments: your project token, trackAutomaticEvents, an optional useNative flag (defaults to true), and an optional storage adapter for JavaScript mode. Additional runtime configuration is passed to init().
featureFlagsOptions, configures Feature Flags. Pass { enabled: true } and optional context and persistence fields to opt in. See Feature Flags for the full configuration reference.
Javascript Mode
The Mixpanel React Native SDK supports React Native for Web and other platforms utilizing React Native that do not support iOS and Android directly via Javascript Mode. To enable Javascript Mode:- Install
AsyncStoragewhich is used to persist data. If this is unavailable in your target environment, you can import/define a different storage class. Please refer tothis documentation.
- Initializing the Mixpanel object with
useNativeset tofalse.
- Legacy Automatically Tracked Events are not supported
- Javascript Mode does not have the same default properties as Native Mode
- Data does not automatically flush when the app is backgrounded. Be sure to call
.flush()more frequently for key events
Sending Events
Use the.track() method to send an event by providing the event name and any event properties. This will trigger a request to the /track API endpoint to ingest the event into your project.
The /track endpoint will only validate events with timestamps within the last 5 days of the request. Events with timestamps older than 5 days will not be ingested. See below on best practices for historical imports.
Timing Events
You can track the time it took for an action to occur, such as an image upload or a comment post, using.timeEvent(). This will mark the “start” of your action, which will be timed until you finish with a track call. The time duration is then recorded in the “Duration” property.
Example Usage
Flushing Events
To preserve battery life and customer bandwidth, the Mixpanel library doesn’t send the events you record immediately. Instead, it sends batches to the Mixpanel servers every 60 seconds while your application is running, as well as when the application transitions to the background. Call.flush() manually if you want to force a flush at a particular moment.
Example Usage
Javascript
.setFlushBatchSize() method to adjust the batch size limit for flushing.
Example Usage
Javascript
Importing Historical Events
The React Native SDK is a tracking SDK designed for real-time tracking in a client-side environment. Callingtrack() triggers a request to our /track API endpoint, which will validate for events with a timestamp that is within the last 5 days of the request. Events older than 5 days will not be ingested.
For bulk import of historical events older than 5 days, we will need to use the /import API endpoint which is optimized for scripting and supports ingesting historical data. We recommend the Python SDK (see the .import_data() function) and mixpanel-utils module (see the import_events() function) which both leverages the /import API for event ingestion.
Setting Super Properties
Super properties are global event properties that you define once and apply to all events. To register super properties, call.registerSuperProperties().
Use .registerSuperPropertiesOnce() to register super properties without overwriting existing values.
Example Usage
.init().
Example Usage
Managing User Identity
You can handle the identity of a user using the.identify() and .reset() methods. Learn more about identity management and identifying users.
Identify
Call.identify() when you know the identity of the current user, passing in their user ID as an argument. This is typically at account registration and at log in.
Example Usage
Call Reset at Logout
Call.reset() to clear data attributed to a user when they logout. This will clear the local storage and allows you to handle multiple users on a single device.
Example Usage
Javascript
Storing User Profiles
Once your users are identified, create user profiles by setting profile properties to describe them. Example profile properties include “name”, “email”, “company”, and any other demographic details about the user. The React Native SDK provides a few methods for setting profile properties under thePeople class accessible via .getPeople(). These methods will trigger requests to the /engage API endpoint.
Setting Profile Properties
You must call
.identify() before setting profile properties in order to associate the profile properties you set with the target user. If identify is not called, the profile update will be queued for ingestion until an identify call is made..getPeople().set() method.
If a profile property already exists, it will be overwritten with the latest value provided in the method. If a profile property does not exist, it will be added to the profile.
Example Usage
Javascript
Other Types of Profile Updates
There are a few other methods for setting profile properties. See a complete reference of the available methods here. A few commonly used people methods are highlighted below:- .setOnce()
- .append()
- .union()
- .increment()
The
.getPeople().setOnce() method set profile properties only if they do not exist yet. If it is setting a profile property that already exists, it will be ignored.Use this method if you want to set profile properties without the risk of overwriting existing data.Example UsageGroup Analytics
Read more about Group Analytics before proceeding. You will need to have the group key defined in your project settings first.
group_key and group_id.
group_keyis the event property that connects event data to a group. (e.g.company)group_idis the identifier for a specific group. (e.g.mixpanel,company_a,company_b, etc.)
Adding Users to a Group
All events must have the group key as an event property in order to be attributed to a group. Without the group key, an event cannot be attributed to a group. Call the.setGroup() method to register the current user to a group, which would add the group_key as an event property set to the group_id value to all events moving forward.
Javascript
group_key value as a list of multiple group_id values.
Call .addGroup() to add additional group_ids to an existing list.
Example Usage
Adding Group Identifiers to User Profiles
To connect group information to a user profile, include thegroup_key and group_id as a user profile property using the getPeople().set() call.
Example Usage
Javascript
Setting Group Profile Properties
Create a group profiles by setting group properties, similar to a user profile. For example, you may want to describe a company group with properties such as “ARR”, “employee_count”, and “subscription”. To set group profile properties, specify the group that needs to be updated by calling.getGroup(), then set the group properties by chaining the .set() method, which will trigger a request to the /groups API endpoint.
Example Usage
Other Group Profile Methods
See all of the methods under the Group class here. A few commonly used group methods are highlighted below:- .setOnce()
- .unset()
- .union()
- .remove()
The
.getGroup().setOnce() method set group profile properties only if they do not exist yet. If it is setting a profile property that already exists, it will be ignored.Use this method if you want to set group profile properties without the risk of overwriting existing data.Example UsageFeature Flags
Feature Flags let you control the rollout of features, run A/B experiments, and change application behavior without shipping new code. They work in both native mode (iOS and Android) and JavaScript mode (React Native Web). Enable feature flags by passingfeatureFlagsOptions with enabled: true to .init(), then evaluate flags on mixpanel.flags.
Session Replay
Session Replay records the mobile UI of your React Native app so you can see what your users saw. Recording ships as a separate package,@mixpanel/react-native-session-replay, and installs alongside the main mixpanel-react-native SDK.
Debug Mode
To enable debug mode, call the .setLoggingEnabled() withtrue, then run your iOS project with Xcode or android project with Android Studio. The logs will be available in the console.
Example Usage
Remove this parameter before going into production.
Privacy-Friendly Tracking
You have control over the data you send to Mixpanel. The React Native SDK provide methods to help you protect user data. Learn more about Privacy.Opt Out of Tracking
The React Native SDK is initialized with tracking enabled by default. Use the.optOutTracking() method to opt the user out of data tracking and local storage for the current Mixpanel instance.
Example Usage
optOutTrackingDefault as the first argument to .init(). Once the user is ready to be tracked, call .optInTracking() to start tracking.
Example Usage
EU Data Residency
Route data to Mixpanel’s EU servers by setting theserverURL to https://api-eu.mixpanel.com.
The recommended approach is to pass the serverURL to .init() so it is set before any events are sent. The .init() method accepts the serverURL as its third argument (available in SDK v3.3.0 and above).
Learn more about EU Data Residency.
Example Usage
.setServerURL() to change the serverURL after initializing the client.
India Data Residency
Route data to Mixpanel’s India servers by setting theserverURL to https://api-in.mixpanel.com.
The recommended approach is to pass the serverURL to .init() so it is set before any events are sent. The .init() method accepts the serverURL as its third argument (available in SDK v3.3.0 and above).
Learn more about India Data Residency.
Example Usage
.setServerURL() to change the serverURL after initializing the client.
Disable Geolocation
The React Native SDK parse the request IP address to generate geolocation properties for events and profiles. To disable geolocation, call thesetUseIpAddressForGeolocation() method with a value of false.
Learn more about geolocation.
Example Usage
Tracking Via Proxy
You can route events from Mixpanel’s SDKs via a proxy in your own domain, which can reduce the likelihood of ad-blockers impacting your tracking.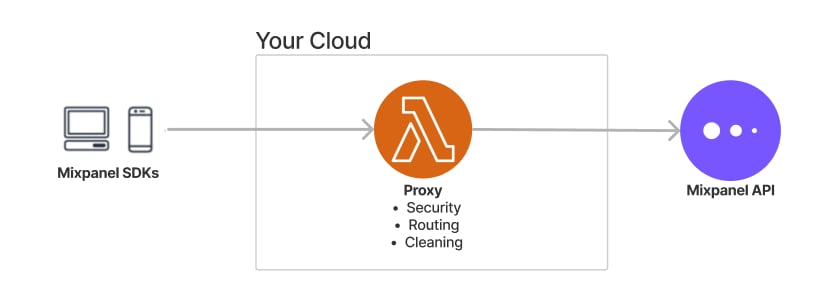
<YOUR_PROXY_DOMAIN> with your proxy server’s domain and pass it as the third argument to .init().